Swift And C: Everything You Need to Know on Types, Pointers and more
Posted on April 7, 2016 中文版
Update 5/17:A few minor improvements here and there related to other additions in Swift 3
Update 3/17:This post has been updated to Swift 3 and extended with way more details and examples on UnsafePointers.
Only a few months have passed since the open-source release of Swift but the language has already been ported to numerous new platforms and new projects to port Swift somewhere else pop up every month.
The availability on different platforms turned mixing Swift and C from something that appeared to be an esoteric practice with a very limited practical utility other than wrapping native libraries to something you could have to deal with daily depending on where your code is running.
While some of the basics of C interoperability are well explained in the official guide Using Swift with Cocoa and Objective-C, more than a few things, especially related to the actual usage of bridged functions in real world scenarios, still remain mysterious and documented and explained properly only in an handful of blog posts.
This article will hopefully shed some light on the most non-obvious details and give you some practical examples of how to interact with C APIs, and while this post have been written mainly for people that plan to start developing in Swift on Linux, everything explained here also applies to Darwin-based OSes.
After a brief description of how C types are imported in Swift, we’ll delve into the specifics of pointers, strings and functions, and conclude with a short tutorial about creating mixed Swift/C projects using LLVM modules.
Get the mixed Swift/C playground for this post from GitHub or zipped.
Contents
- C Types
- Macros
- Working with Pointers
- Working with Strings
- Working with Functions
- Working with Files
- Bitwise operations
- Swift and C: Mixed Projects
- Swift 3 Changes
- Closing Thoughts
C Types
For each one of the basic C types, Swift provides a corresponding equivalent type that can be used when interoperating with C functions from Swift:
| C Type | Swift C Type | Typealias of |
|---|---|---|
| bool | CBool | Bool |
| char,unsigned char | CChar, CUnsignedChar | Int8, UInt8 |
| short, unsigned short | CShort, CUnsignedShort | Int16, UInt16 |
| int, unsigned int | CInt, CUnsignedInt | Int32, UInt32 |
| long, unsigned long | CLong, CUnsignedLong | Int, UInt |
| long long, unsigned long long | CLongLong, CUnsignedLongLong | Int64, UInt64 |
| wchar_t, char16_t, char32_t | CWideChar, CChar16, CChar32 | UnicodeScalar, UInt16, UnicodeScalar |
| float, double | CFloat, CDouble | Float, Double |
The table above, in addition to what is already described in the official documentation, shows the actual Swift type the C typealias refers to.
Even if when writing code that interacts with C APIs you should use the Swift C types when possible, you’ll notice that the result of the import from C performed by Swift will most of the times simply use the usual Swift fixed-size types you are already familiar with.
Arrays and Structs
Let’s now talk about compound data structures like arrays and structs.
In an ideal world, you would expect that a global array like this one:
//header.h

char name[] = "IAmAString";
would be translated as a Swift String or at least as an array of some kind of character type. Well… this is what happens instead, once we try to use that imported name array in Swift:
print(name) // (97, 115, 100, 100, 97, 115, 100, 0)
This alone is more than enough to recommend using pointer to sequences of objects instead of vanilla arrays every time you can on the C layer of mixed Swift/C applications, to avoid painful translations once you reach the Swift layer.
But wait, can that global string declared with an array be recovered only with a convoluted piece of code converting the tuple to something more useful? Actually no, we’ll see how to fix that tuple with a few lines of code when discussing pointers.
Luckily, the situation it’s not so dire when dealing with structs, that are converted as Swift structs as expected, and its members are treated in the same predictable way, each one is converted recursively to the related Swift type.
For example, this struct:
typedef struct {
    char name[5];
    int value;
    int anotherValue;
} MyStruct;
is converted to a MyStruct Swift struct. This clean conversion simplifies struct initialization too that is also performed as usual:
let ms = MyStruct(name: (0, 0, 0, 0, 0), value: 1, anotherValue:2)
print(ms)
In one of the next sections we’ll see that this is not the only way to allocate and initialize an instance of a struct and especially if we just need a pointer to an empty object it could be easier to just allocate a new empty struct pointer instance manually.
Enums
If you need to access a C enum from Swift, declaring it as you usually do in C:
typedef enum ConnectionError{
    ConnectionErrorCouldNotConnect = 0,
    ConnectionErrorDisconnected = 1,
    ConnectionErrorResetByPeer = 2
}
Will get you something completely different from what you expected, once imported in Swift that enum will be represented by a structure and some global variables:
struct ConnectionError : RawRapresentable, Equatable{ }

var ConnectionErrorCouldNotConnect: ConnectionError {get}
var ConnectionErrorDisconnected: ConnectionError {get}
var ConnectionErrorResetByPeer: ConnectionError {get}
And it’s quite obvious that this way we’ll lose all the capabilities that native Swift enums provide. But getting what we want is just a matter of using a specific macro in C:
typedef NS_ENUM(NSInteger,ConnectionError) {
    ConnectionErrorCouldNotConnect,
    ConnectionErrorDisconnected,
    ConnectionErrorResetByPeer
}
Using the NS_ENUM macro (more details on this macro that is equivalent to declaring a classic C enum, here), this is how Swift will import the enum:
enum ConnectionError: Int {
    case CouldNotConnect
    case Disconnected
    case ResetByPeer
}
Notice that the conversion also stripped away the prefix that the enum had, this is one of the conversion rules of Swift that you can also see in action when you use the standard iOS/OSX frameworks in Swift.
Additionally, Swift also provides a NS_OPTIONS macro that can be used to declare option sets conforming to OptionSetType. To learn more about this macro, check out the official documentation.
Unions
Let’s talk about unions, an interesting C type that has no Swift counterpart.
Swift supports unions only partially, meaning that while unions will be imported, not every kind of field is supported and as a consequence, some of the fields that you have declared in C could not be available (at the moment there is no documentation about what is not supported).
Let’s see an example of actual usage of this scarcely documented C type:
//header.h
union TestUnion {
    int i;
    float f;
    unsigned char asChar[4];
} testUnion;
Here we’ve declared a TestUnion type with a related testUnion union variable, each field represents a different view on the same 4 byte chunk of memory, in C we would be able to access testUnion either as an integer, a float or as a set of bytes.
Since there is nothing similar to unions in Swift, this type will be imported as a struct:
strideof(TestUnion)  // 4 bytes

testUnion.i = 33
testUnion.f  // 4.624285e-44
testUnion.i  // 33
testUnion.asChar // (33, 0, 0, 0)

testUnion.f = 1234567
testUnion.f  // 1234567
testUnion.i  // 1234613304
testUnion.asChar // (56, 180, 150, 73)
The first line verifies that this type, like we would expect from an union, is indeed only 4 bytes long and the next lines modify one of the fields to verify that the values contained in the others are updated too. But why when we set testUnion with 33 using the integer field we get 4.624285e-44 when we read the field as a float?
This is related to how unions work. You can think of an union as a bag of bytes that can be set or read using the formatting rules of each one of the fields it’s composed of, what we did above was setting that 4 bytes memory area with the same bit content an Int32(33) would have had, and then we read the 4 bytes memory area interpreting its bit pattern like a IEEE float.
But let’s verify this using the useful (but dangerous) unsafeBitCast function:
var fv:Float32 = unsafeBitCast(Int32(33), to: Float.self) // 4.624285e-44
Here we are doing exactly the kind of conversion that happens when we access the union as a float, we are taking the bits that compose an Int32 with value 33 and assigning to them a variable with Float type without any conversion or safety checks.
Now that we’ve see how this behave, could we implement a similar struct manually in Swift?
Even without checking the source, we can guess that TestUnion it’s just a simple struct backed by a memory block of 4 bytes (it’s not important in which form) and the properties we access are just computed properties that hide all the conversion operations with their set/get.
The size of things
In Swift you can obtain the data-only or memory size of a specific type (primitive or compound) using the MemoryLayout<T> generic struct and the properties and functions it provides.
If you are interested in the size of the data contained in a variable, ignoring any additional space added to guarantee memory alignment, you can use the size property of the type or its static method size(ofValue:).
As you could have guessed, MemoryLayout also provides an additional property and a function to correctly retrieve the size of variables or types that take into account the additional space needed for alignment and that you should favor instead of the previous ones most of the times: stride and its static method stride(ofValue:).
Let’s see an example where you’ll notice the difference between the values returned by size and stride:
print(MemoryLayout<CChar>.stride)  // 1 byte

struct Struct1{
    let anInt8:Int64
    let anInt:Int16
    let b:Bool
}

print(MemoryLayout<CStruct1>.size))    // 11 (8+2+1) byte
print(MemoryLayout<CStruct1>.stride)  // 16 (8+4+4) byte
And while the amount of additional space added to abide to the alignment rules of the processor architecture can be obtained doing a difference between the value returned by stride and size, an additional property alignment is also available.
Null, nil, 0
Luckily, Swift does not have an additional constant to represent null values, you can just use the Swift nil, regardless of the type of the specific variable or parameter.
As we’ll see when talking about pointers, nil gets also automatically translated to a null Unsafe[Mutable]RawPointer? when passed as a parameter.
If you need a typed null pointer instead, you can create one assigning the nil value to an optional pointer:
let p: UnsafeMutablePointer<UInt8>? = nil
Just don’t try to unwrap this optional since it contains a nil value, assigning nil to an implicitly unwrapped optional is also ok.
Macros
Simple C defines are translated in Swift as global constants, something like this in C:
#define MY_CONSTANT 42
Will be translated as:
let MY_CONSTANT = 42
More complex macros and preprocessor directives will be completely ignored by Swift and will not be available.
Swift also provides a simple conditional compilation statement and some support functions that can be used to include certain sections of code only for specific OSes, architectures or versions of Swift.
#if arch(arm) && os(Linux) && swift(>=2.2)
    import Glibc
#elseif !arch(i386)
    import Darwin
#else
    import Darwin
#endif

puts("Hello!")
In this example, we’ll import the standard c library from a different source depending on the fact that we are compiling this application on an ARM Linux host or not.
The functions available to customize the compilation behavior are: os() (with valid values: OSX, iOS, watchOS, tvOS, Linux), arch() (with valid values: x86_64, arm, arm64, i386) and swift() (that requires its parameter to be specified as >=version number). The results of these functions can be combined with some basic logical operators to build complex rules: &&, ||, !.
And since this is the first time we see it, remember that as on OSX you would import Darwin (or one of the frameworks that depends on it) in your projects to gain access to the libc functions and on a platform like Linux you’ll need to import Glibc.
Working with Pointers
Pointers are automatically translated to different kinds of UnsafePointer<Pointee> objects depending on the characteristics of the value they point to:
| C Pointer | Swift Type |
|---|---|
| int * | UnsafeMutablePointer<Int32> |
| const int * | UnsafePointer<Int32> |
| NSDate** | AutoreleasingUnsafeMutablePointer<NSDate> |
| struct UnknownType * | OpaquePointer |
| void * | UnsafeMutableRawPointer |
| const void * | UnsafeRawPointer |
While the general rule is that mutable Pointer instances point to mutable variables, for class objects as in the third example NSDate**, pointers to object passed as pointers are translated as AutoreleasingUnsafeMutablePointer.
Moreover, if the type we are pointing to is not completely defined or cannot be represented in Swift (structs or unions that can only partially be translated from C), the pointer will be translated as an OpaquePointer, an untyped pointer, essentially just a struct that contains some bits. Values pointed to by an OpaquePointer cannot be accessed directly, the Pointer variable will need to be converted first.
Conversions from the three mutable Unsafe[Mutable]Pointer types to UnsafePointer<Type> are performed automatically (for example when you are passing a mutable pointer to a function requiring an immutable pointer) while a compiler error is raised the other way around.
A pointer to an immutable value cannot be converted to a pointer to a mutable value implicitly, Swift tries to guarantee a minimum of safety even in this circumstance, and this is an example of one of the operations on pointers that as we’ll see need to be performed manually. To obtain a mutable unsafe pointer you must now use the initialize UnsafeMutablePointer(mutating:)
It’s important to note that since Swift 3.0 conversion between pointers with different element types using the init method is not possible anymore, casting will need to be done explicitly with specific methods as we’ll see in one of the following sections.
The release 3.0 of Swift most notably added the UnsafeRawPointer type to deal with untyped pointers, pointers that will normally be represented in C as void pointers and that were represented in Swift 2.x as Unsafe[Mutable]Pointer<Void>
UnsafeRawPointers have a few methods that as we’ll see in the following sections will make our life a lot more easier simplifying all operations related to pointer conversions.
All the pointer types, with the exclusion of raw pointers and opaque pointers, are type safe (the compiler will perform type checks on the pointer and its content) and guarantee address alignement with the Pointee type they point to (the pointer, even after operations that alter its address moving int forwards or backwards, will always point at the start of a Pointee value).
The “unsafe” prefix in all those type names instead, refers to how we access the content, because interacting with pointers directly allows to circumvent the safety measures that the language has put in place when we access objects and is therefore considered inherently unsafe.
But what about the lifetime of the pointed object? How are they handled, if they are, through ARC?
As we already know, Swift uses ARC to manage the lifetime of reference types (and some struct and enums are tracked too when they contain reference types) and to track ownership, does unsafe pointers behave in some peculiar way?
No, Unsafe[Mutable]Pointer<Type> structs will be tracked if they are pointing to a reference type (a class object) or if they contain some reference to be tracked, that’s something you should know and that will help us explain something apparently weird when we’ll talk about memory allocation.
But again, this is not true for raw pointers and opaque pointers, that are not managed by ARC. And because of this, in some circumstances you’ll need to use a specific utility class called Unmanaged to control the lifetime of the pointed objects, we’ll discuss this later.
Now that we know how pointers are represented, there are two things left to describe: how pointers can be dereferenced to obtain or modify the value they point to and how we can obtain a pointer to a new or preexisting Swift variable.
Once you get a hold of a non-Void Unsafe[Mutable]Pointer<T> retrieving or modifying the pointed value is straightforward using the pointee property:
var anInt:Int = myIntPointer.pointee   //UnsafeMutablePointer<Int> --> Int

myIntPointer.pointee = 42

myIntPointer[0] = 43
And you can also access a specific element in a sequence of pointers of the same type as you would do in C, using a convenient array subscript, where each increment of the index will move you to the next element of size MemoryLayout<T>.stride of the sequence.
On the other hand, if you need to obtain an Unsafe[Mutable]Pointer to a Swift variable to use it as parameter of a function call and only in that situation, this can be done easily using the same operator we use to pass inout parameters by address to functions:
let i = 42
functionThatNeedsAPointer(&i)
Considering that the operator cannot be used to perform that conversion outside of the described function invocation context, if you need to get a hold of the pointer variable to perform further computation (e.g. a pointer type conversion), Swift provides the withUnsafePointer and withUnsafeMutablePointer utility functions:
withUnsafePointer(&i, { (ptr: UnsafePointer<Int>) -> Void in
    var vptr= UnsafeRawPointer(ptr)
    functionThatNeedsAVoidPointer(vptr)
})

let r = withUnsafePointer(&i, { (ptr: UnsafePointer<Int>) -> Int in
    var vptr= UnsafeRawPointer(ptr)
    return functionThatNeedsAVoidPointerAndReturnsInt(vptr)
})
This function creates a pointer object for the given variable and passes it to a closure that can then use it and optionally return a value. The pointer is guaranteed to be valid for the duration of the closure and considering it’s meant to be used only in that context it can’t be returned to the outside scope.
This way, the ability to access the variable unsafely is limited to the well-defined scope of the closure. In the sample above we are converting the int pointer to a void pointer before passing it to a function, in the “Pointers Conversion” section we’ll see how to convert one pointer type to another.
And let’s talk again briefly about OpaquePointer, there is nothing special about it and it can be easily converted to a specific typed pointer thanks to the initializers of the Unsafe[Mutable]Pointer and then accessed using the pointee property like any other Unsafe[Mutable]Pointer:
// ptr is an untyped OpaquePointer

var iptr = UnsafePointer<Int>(ptr)
print(iptr.pointee)
Swift also provides unsafe buffers, that are used to manipulate areas of memory that contain a sequence of values of the same type.
We can obtain a pointer to a classic Swift array with a slightly different syntax that converts it to an Unsafe[Mutable]BufferPointer using one of its methods withUnsafe[Mutable]BufferPointer:
let array: [Int8] = [ 65, 66, 67, 0 ]
puts(array)  // ABC
array.withUnsafeBufferPointer { (ptr: UnsafeBufferPointer<Int8>) in
    puts(ptr.baseAddress! + 1) //BC
}
Note that Unsafe[Mutable]BufferPointer also exposes a baseAddress property that contains the base address of the buffer.
Following the choice made with the withUnsafePointer(to:body:) method, a global static method with the same name is also provided for unsafe buffer.
The proposal SE-0138 implemented in Swift 3.0.1, adds a new global and a new array type method, both called withUnsafeBytes that allows to manipulate the area of memory pointed by a typed pointer via a raw buffer pointer to a series of bytes (UInt8).
Something that can come in handy when you want inspect or alter the underlying raw representation of a high level data structure.
Let’s try this with Swift’s strings, that are built using a _StringCore struct internally, a struct contains three components: a pointer to an area of memory with the actual UTF-8 characters, a bit mask with the length and other flags, and an owner reference.
public struct _StringCore {
  // Internals
  public var _baseAddress: UnsafeMutableRawPointer?
  var _countAndFlags: UInt
  public var _owner: AnyObject?
  ...
We’ll use withUnsafeBytes to print each byte that makes up the structure and then we’ll build a pointer with the first 8 bytes of the struct (obtaining the _baseAddress pointer, stored as little endian, with the Least Significant Byte placed in the first position of the byte sequence) and finally we’ll create new string using the character buffer pointed by _baseAddress as input.
import Foundation


var str = "iAmAStringHello"

withUnsafeBytes(of:&str){ ptr in
    ptr.forEach{
        //Print the content of the underlying _StringCore structure
        print(String(format:"0x%x",$0))
    }
    let strptr = UnsafePointer<UInt8>(bitPattern:
        UInt(ptr[0]) |              // e.g. 0x26
        (UInt(ptr[1]) << 8) |       //      0x58
        (UInt(ptr[2]) << 16) |      //      0xef
        (UInt(ptr[3]) << 24) |      //      0x0e
        (UInt(ptr[4]) << 32) |      //      0x01
        (UInt(ptr[5]) << 40) |      //      0x00
        (UInt(ptr[6]) << 48) |      //      0x00
        (UInt(ptr[7]) << 56) )      //      0x00

    print(String(format:"0x%x",UInt(bitPattern: strptr)))

    //Print the c string stored at address 0x000000010eef5826
    print(String(cString:strptr!))  // Prints: iAmAStringHello
}
As we’ll see in a while, we’ll not need to reconstruct the addresses we stored in memory every time, that piece of code can be greatly simplified as follow, changing the way we access that block of memory and with a few pointer castings:
let tmpp = UnsafeMutableRawPointer(ptr.baseAddress!).assumingMemoryBound(to: Int.self)
let strptr = UnsafeMutablePointer<UInt8>(bitPattern: tmpp.pointee)
I’m not going to explain this yet, after reading the next sections you’ll understand what I did here.
There is another kind of pointer we haven’t discussed yet: function pointers.
Since Swift 2.0, C function pointers are imported in Swift as closures with a special attribute @convention(c) that specifies that the closure conforms to C calling conventions, we’ll see what this means in one of the following sections.
Ignoring these details for a moment, the essential thing to know about function pointers is that every time an imported C function expects a function pointer parameter we will be able to use a closure declared in-place or a Swift function reference as parameter.
Allocating memory
Until now we have only obtained pointers to existing Swift objects but we have never allocated memory manually, in this section we’ll see how this can be done in Swift using the recommended approach or with the functions of the malloc family like we would have done in C (that could make sense in a few very specific circumstances).
But before we start, we should be aware that unsafe pointers like good old C pointers can have three possible states during their lifetime:
- Unallocated: No memory has been reserved for the pointer.
- Allocated: The pointer points to a valid allocated memory location but its value is uninitialized.
- Initialized: The pointer points to an allocated and initialized memory location.
Pointers will move between these states in response to the operations we’ll perform on them.
The recommended approach for dealing with pointers, the one you should choose most of the times, consists in using the methods that the UnsafeMutablePointer class provides, to allocate a new object and then retrieve a pointer to the instance, initialize it and once we’re done with it, clean up its content and deallocate the memory it refers to.
Let’s see a basic example:
var ptr = UnsafeMutablePointer<CChar>.allocate(capacity: 10)

ptr.initialize(from: [CChar](repeating: 0, count: 10))

//Do something with the object
ptr[3] = 42

ptr.deinitialize() //Clean up

ptr.deallocate(capacity: 10) //Let's free the memory we allocated
Here we have allocated a block of memory of 10 CChars (UInt8) using allocate(capacity:) (that for raw pointers has an additional parameter to specify the alignment), that’s basically equivalent to calling malloc specifying the total size of the memory chunk and then casting the result to the specific pointer type we need, but way less error prone since we don’t have to specify manually the size.
c
Once the space for the UnsafeMutablePointer has been allocated, we must initialize the mutable object with one of the initialize methods, for example initialize(to:Pointee, count:Int) to initialize with count number of Pointee values or the initialize(from: Collection) method specifying the initial content with another sequence. When we are done with the object and we want to free the resources allocated, we first clean up its content with deinitialize and then proceed to deallocate the pointer with deallocate(capacity:).
It’s important to note that the Swift runtime will not do this last two things for you, as was your responsibility to allocate the memory needed by the variable it’s also your responsibility to deallocate the object once you are done working on that memory area.
Let’s see another example with a pointer to a more complex Swift value type this time:
var ptr = UnsafeMutablePointer<String>.allocate(capacity: 1)
sptr.initialize(to:"Test String")

print(sptr[0])
print(sptr.pointee)

ptr.deinitialize()
ptr.deallocate(capacity: 1)
The sequence of operations comprising the allocation&initialization and cleanup&deallocation phase are the same for value types and reference types, but if you play around with it you’ll notice that for some value types (like integers,floats or some simple structs) the initialization it’s not actually necessary and you can just initialize the content with the pointee property or via array subscript.
But this will definitely not work when your pointer points to a class or to some specific structs or enums. Sometimes initialization is required, but why?
The reason behind this behavior is related to what happens, from the memory management point of view, when you modify the content in one of the way described above, let’s see a snippet that doesn’t require manual initialization and then one that crashes miserably if we don’t initialize the UnsafeMutablePointer before altering its content.
struct MyStruct1{
    var int1:Int
    var int2:Int
}

var s1ptr = UnsafeMutablePointer<MyStruct1>.allocate(capacity: 5)

s1ptr[0] = MyStruct1(int1: 1, int2: 2)
s1ptr[1] = MyStruct1(int1: 1, int2: 2) //This always works!

s1ptr.destroy()
s1ptr.dealloc(5)
No problem here, this just works, but let’s see this other example:
class TestClass{
    var aField:Int = 0
}

struct MyStruct2{
    var int1:Int
    var int2:Int
    var tc:TestClass // we have introduced a field with a reference type
}

var s2ptr = UnsafeMutablePointer<MyStruct2>.alloc(5)
s2ptr.initialize(from: [MyStruct2(int1: 1, int2: 2, tc: TestClass()),   // Remove the initialization
                        MyStruct2(int1: 1, int2: 2, tc: TestClass())])  // and you'll have a crash below

s2ptr[0] = MyStruct2(int1: 1, int2: 2, tc: TestClass())
s2ptr[1] = MyStruct2(int1: 1, int2: 2, tc: TestClass())

s2ptr.deinitialize()
s2ptr.deallocate(capacity: 5)
What happens here, is related to what was described at the beginning of the Working with Pointers section, MyStruct2 contains a reference and it’s lifetime is managed with ARC. When we modify one of the values in the memory block it points to, the Swift runtime will try to release the previous object contained in that slot, and if the memory contains garbage because it was never initialized, your application will crash.
Be aware of this, and to be on the safe side, favor initializing your UnsafeMutablePointers using initialize once they have been allocated over just setting the memory directly.
The alternative approach we hinted at at the beginning of this section, consists in importing the standard C library (Darwin or Glibc on Linux) and using the familiar functions of the malloc family:
var ptr = malloc(10*MemoryLayout<CChar>.stride).bindMemory(to: CChar.self, capacity: 10*MemoryLayout<CChar>.stride)

ptr[0] = 11
ptr[1] = 12

free(ptr)
As you can see we are not initializing the instance like we did when we followed the recommended approach, because as noted in the last paragraph with a type like CChar or some basic structs this will work.
Let’s now see two additional examples of usage of two common functions: memcpy and mmap:
var val = [CChar](repeating: 0, count: 10)
var buf = [CChar](repeating: 0, count: val.count)

memcpy(&buf, &val, buf.count*MemoryLayout<CChar>.stride)
buf // [1,1,1,1,1,1,1,1,1,1]

let mptr = mmap(nil, Int(getpagesize()), PROT_READ | PROT_WRITE, MAP_ANON | MAP_PRIVATE, -1, 0)!

if (Int(bitPattern: mptr) == -1) {    //MAP_FAILED not available, but its value is (void*)-1
    perror("mmap error")
    abort()
}

// Bind the *uninitialized* memory to the Int type, for initialized memory we should have used .assumingMemoryBound(to:)
let iptr = mptr.bindMemory(to: Int.self, capacity: Int(getpagesize())/MemoryLayout<Int>.stride)
iptr[0] = 3

munmap(ptr, Int(getpagesize()))
This code is similar to what you would have done in C, note that you can easily retrieve the size of a memory page with getpagesize().
But while the first example just shows that we can use memcpy, the second shows a real use case for the alternative approach to memory allocation, here we are mapping a new memory page but we could have mapped a specific memory area or a specific file pointer, and in that case we would have needed only direct access to the preexisting content, without any initialization.
Let’s see a real world example taken from SwiftyGPIO, here I’m mapping the area of memory that contains the registers for the digital GPIO pins of the Raspberry Pi that will be used throughout the library to read or write values:
// BCM2708_PERI_BASE = 0x20000000
// GPIO_BASE = BCM2708_PERI_BASE + 0x200000 /* GPIO controller */
// BLOCK_SIZE = 4*1024

private func initIO(id: Int){
    let mem_fd = open("/dev/mem", O_RDWR | O_SYNC)
    guard (mem_fd > 0) else {
        print("Can't open /dev/mem")
        abort()
    }

    let gpio_map = mmap(
        nil,                 //Any adddress in our space will do
        BLOCK_SIZE,          //Map length
        PROT_READ|PROT_WRITE,// Enable reading & writting to mapped memory
        MAP_SHARED,          //Shared with other processes
        mem_fd,              //File to map
        off_t(GPIO_BASE)     //Offset to GPIO peripheral
        )!

    close(mem_fd)

    let gpioBasePointer = gpio_map.assumingMemoryBound(to: Int.self)

    if (Int(bitPattern:gpioBasePointer) == -1) {    //MAP_FAILED not available, but its value is (void*)-1
        perror("GPIO mmap error")
        abort()
    }

    gpioGetPointer = gpioBasePointer.advanced(by: 13)
    gpioSetPointer = gpioBasePointer.advanced(by: 7)
    gpioClearPointer = gpioBasePointer.advanced(by: 10)

    inited = true
}
Once we’ve mapped the 4KB area starting at 0x20200000, we retrieve the address of the 3 registers we are interested in and from there we just read or write their values through the memory property.
Pointer Conversion
Conversions between Unsafe[Mutable]Pointers with a different type can be performed in a few ways.
If you need to bind the content pointed by a pointer to a different type temporarily, obtaining what we could consider a different view of the pointed data, you can use withMemoryRebound(to:capacity:body:) that provides an UnsafaMutablePointer in the context of a closure where you can modify the data, essentially circumventing momentarily the type safety rules of the original pointer.
// With ptr being an UnsafeMutablePointer<UInt8>

let charPtr = ptr.withMemoryRebound(to: CChar.self, capacity: 11, {
    (cptr) -> String in
        return String(validatingUTF8: cptr)!
})
To perform a permanent type conversion, you’ll need raw pointers.
A raw pointer pointing to the same address can simply be created initializing a raw pointer with the typed pointer you want to convert, using either the method assumingMemoryBound(to:) or bindMemory(to:capacity) depending on the state of the memory you are binding to the new type. If the block of memory the pointer points to is uninitialized use bindMemory(to:capacity), using this method on already bound memory rebinds it to the new type. On already initialized memory that was already bound to the new type and is correctly aligned, use assumingMemoryBound(to:) instead.
We have already seen a few examples with these methods in the previous section but now let’s isolate only what we really need to perform a simple pointer conversion:
UnsafeRawPointer(typedPointer).bindMemory(to: UInt8.self capacity:1024)
In some very specific circumstances, and only after serious consideration, you could reach the conclusion that, for example for performance reasons, it could make sense to do without the safety features that Swift provides, and just work with raw pointers and maybe perform some type punning.
As we have already seen, most of the functionalities you’ll need in this cases are offered by the Unsafe[Mutable]RawPointer object. Let’s see a few other methods that are available to operate on chunks of memory without having to worry about type safety checks.
// Get a value starting at a specific offset and cast it to a type
let value = ptr.load(fromByteOffset: 8, as: UInt8.self)

// Set a value at a specific offset and with the specific type
ptr.storeBytes(of: 0xFA, toByteOffset: 8, as: UInt8.self)

// Copy bytes from another pointer
ptr.copyBytes(from: anotherPtr, count: 10 * MemoryLayout<UInt8>.stride)
Now we are ready to go back to the char array we had at the beginning of this article, with all the information we have now and knowing that a CChar tuple is automatically converted to a pointer of a sequence of CChar we can convert the tuple to a String easily:
let namestr = withUnsafePointer(to: &name, { (ptr) -> String? in
    let charPtr = ptr.withMemoryRebound(to: CChar.self, capacity: 11, {
        (cptr) -> String in
            return String(validatingUTF8: cptr)!
    })
    return charPtr
})

print(namestr!) //IA#AString
Pointer arithmetic
In C is quite common to use pointers arithmetic to move through sequences or to get a reference to a specific member of compound variables, can this be done in Swift too?
Sure, UnsafePointer and its mutable variants provide a few convenient methods that allow to perform the same operations that in C we’ll perform leveraging pointer arithmetic incrementing or decrementing pointers: successor(), predecessor(), advanced(by:) and distance(to:UnsafePointer<T>).
var aptr = UnsafeMutablePointer<CChar>.allocate(capacity: 5)
aptr.initialize(from: [33,34,35,36,37])

print(aptr.successor().pointee) // 34
print(aptr.advanced(by: 3).pointee) // 36
print(aptr.advanced(by: 3).predecessor().pointee) // 35

print(aptr.distance(to: aptr.advanced(by: 3))) // 3

aptr.deinitialize()
aptr.deallocate(capacity: 5)
Even if I’ve presented these methods first and even if those are the one I recommend you to use, it’s still possible to increment and decrement an unsafe pointer adding an integer to obtain a pointer to one of the other elements in a sequence:
print((aptr+1).pointee) // 34
print((aptr+3).pointee) // 36
print(((aptr+3)-1).pointee) // 35
When you increment or decrement an Unsafe[Mutable]Pointer, the actual pointer is moved by multiples of MamoryLayout<Pointee>.alignement. Raw pointers or opaque pointers are instead just incremented or decremented by the given number of positions.
The classic use case for pointer arithmetic is the traversal of components of structures or of structures that contain nested sub-structures.
Let’s see an example that uses some of the techniques explained until now with a data structure composed by an header, defined as a Header struct with a few fields, and a body with a series of float values. We will first allocate an untyped pointer to the whole block of memory and then obtain two typed pointers to the two distinct logical segments:
struct Header{
    let field1: Int64 // 8 bytes
    let field2: Int32 // 4 bytes
    let field3: Int64 // 8 bytes
}

let numValues = 100 // 100 float values in the body

let ptr = UnsafeMutableRawPointer.allocate(
  bytes: MemoryLayout<Header>.stride + numValues * MemoryLayout<Float>.stride,
  alignedTo: MemoryLayout<Header>.alignment)

let header = ptr.bindMemory(to: Header.self, capacity: 1)
let data = (ptr + MemoryLayout<Header>.stride).bindMemory(to: Float.self, capacity: numValues)
With the code above we’ll end up with two UnsafeMutablePointer instances, one pointing at the beginning of the memory area and one shifted of 20 bytes containing a series of 100 floats.
Working with addresses
Sometimes you could need to retrieve the actual pointer value to perform some calculation with it or to store it like an integer. This could be done before Swift 3.0 with an unsafe bit cast to an integer of compatible size:
import Foundation

func address<T>(of: UnsafePointer<T>) -> UInt {
    return unsafeBitCast(of, to:UInt.self)
}

var a = 1
print( String(format:"0x%016x",address(of:&a)) )
But since Swift 3.0 you can accomplish the same thing way more safely using an Int or UInt initializer with every pointer type:
import Foundation

func address<T>(of: UnsafePointer<T>) -> UInt {
    return UInt(bitPattern: of)
}

var a = 1
print( String(format:"0x%016x", address(of: &a)) )
What if you already have and integer representation of an address pointer and need to build an unsafe pointer from that?
Swift has a specific unsafe pointer initializer to do it without resorting again to the unsafe bit cast. You can either create a typed pointer or a raw pointer using a specific integer bit pattern as address.The address will need to be correctly aligned to the Pointee type, meaning that pattern % MemoryLayout<Pointee>.alignment should be 0.
let ptr = UnsafeMutableRawPointer(bitPattern: 0x12345678)!
But please not that trying to unwrap a pointer with bit pattern equal to zero (a null pointer) will result in a crash, like it would for any other optional Swift type with a nil value.
Get the mixed Swift/C playground for this post from GitHub or zipped.
Working with Strings
When a C functions has a char pointer parameter, as we now know, this parameter is imported in Swift as an Unsafe[Mutable]Pointer<Int8>, but since Swift automatically converts strings into pointer to UTF8 buffers, you’ll be able to invoke those functions simply using a string as parameter, without manually converting it first.
Alternatively, if you need to perform additional operations with that pointer before invoking the function expecting a char pointer, Swift strings also provide the withCString method that passes the UTF8 char buffer to a closure that can optionally return a value.
puts("Hey! I was a Swift string!") //Passing a swift string to a libc method

var testString = "AAAAA"

testString.withCString { (ptr: UnsafePointer<Int8>) -> Void in
    // Do something with ptr
    functionThatExpectsAConstCharPointer(ptr)
}
Turning a C string into a full fledged Swift string is straightforward, just use the init(cString:) or init?(validatingUTF8:) String initializers, but remember that the C string must be null terminated.
let swiftString = String(validatingUTF8: aCString)!
If you are porting some C code that deals with strings to Swift, for example something handling with user input, you could have the need to compare the value of each character in a string against a single ASCII character value or an ASCII range, can this be done in Swift considering how strings are structures?
Yes, but i will not delve too much into the specifics of Swift strings, if you want to learn more about how strings in Swift are structured read this article from Ole Begemann and this article by Andy Bargh to learn more about Unicode.
Let’s see an example of a function that verifies if a string is composed only by basic ASCII printable characters that looks like something that could have been ported from C:
func isPrintable(text:String)->Bool{
    for scalar in text.unicodeScalars {
        let charCode = scalar.value
        guard (charCode>31)&&(charCode<127) else {
            return false // Unprintable character
        }
    }
    return true
}
What in C was likely a comparison between a char integer value and an ASCII range for each character composing the string, in Swift doesn’t change much and just uses the value of each one of the unicode scalars for the comparison. Clearly, this approach makes sense only if those strings have graphemes composed by a single scalar, not much in the general case.
And what about simple conversions between characters and their numerical ASCII value?
To convert a numerical value to the corresponding Character or String we must first convert it to an UnicodeScalar, while the most compact way to do the opposite uses the specific constructor that only the UInt8 type provide:
let c = Character(UnicodeScalar(70))   // "F"

let s = String(UnicodeScalar(70))      // "F"

let asciiForF = UInt8(ascii:"F")       // 70
The guard statement in the previous example could have been improved with UInt8(ascii:) to increase readability.
Working with Functions
As happened with strings, Swift is able to automatically convert closure into C function pointers when used as parameters, but with a major twist, closures that will be used as a C function pointer parameter cannot capture any value outside of their context.
To enforce this, this kind of closures (and closures that are the result of a conversion from a C function pointer) are annotated automatically with a specific type attribute @convention(c) that, as described in the chapter on type attributes of Swift Language Reference, indicate the calling convention the closure will conform to. The possible value are : c, objc and swift.
A few alternatives to work around this limitation are described in this article by Chris Eidhof and consist in using a block-based function, if you are on a Darwin-derived OS and are calling a function that also have a block variant, or passing a retained environment object to the function following a common C pattern.
Now let’s talk briefly about variadic functions.
Swift does not support traditional variadic C functions and this will be clear the first time you try to call a function like printf form Swift, compile time error. If you really need to use one of those, the only viable alternative is building a wrapper function in C that limits the number of parameters or a wrapper that accepts multiple parameters indirectly using a va_list (that is supported by Swift).
So, even if printf does not work, vprintf or similar functions will.
To turn an array of parameters or a variadic Swift parameter list into a va_list pointer, each parameter must implement CVarArgType and then you just need to call withVaList to obtain a CVaListPointer that points to your list of parameters (getVaList is also available but the documentation recommends to avoid it). Let’s see a short example with vprintf:
withVaList(["a", "b", "c"]) { ptr -> Void in
    vprintf("Three strings: %s, %s, %s\n", ptr)
}
Unmanaged
We’ve learn more or less everything we have to know about pointers, but there is still something that we’ll not be able to handle with what we know now.
What if we pass to a C function that returns its result in a callback a Swift reference object as parameter? Can we be sure that during this switch of context the Swift object will still be there and that ARC will not have released it? No, we can’t make the assumption that the object will still be there.
Meet Unmanaged, a class with some interesting utility methods that we’ll use to manage situations like the one described above. With Unmanaged you will be able alter the retain count of an object and convert it to a COpaquePointer if you need to pass it around.
Let’s get right into it and solve the issue we described, here is an example of a C function similar to what was described before:
// cstuff.c
void aCFunctionWithContext(void* ctx, void (*function)(void* ctx)){
    sleep(3);
    function(ctx);
}
And some Swift code that calls it:
class AClass : CustomStringConvertible {

    var aProperty:Int=0

    var description: String {
        return "A \(type(of: self)) with property \(self.aProperty)"
    }
}

var value = AClass()

let unmanaged = Unmanaged.passRetained(value)
let uptr = unmanaged.toOpaque()
let vptr = UnsafeMutableRawPointer(uptr)

aCFunctionWithContext(vptr){ (p:UnsafeMutableRawPointer?) -> Void in
    var c = Unmanaged<AClass>.fromOpaque(p!).takeUnretainedValue()
    c.aProperty = 2
    print(c) //A AClass with property 2
}
With the passRetained and passUnretained methods, Unmanaged retains a given object for us, respectively incrementing or not its reference count.
Since the callback needs a void pointer, we first obtain a COpaquePointer with toOpaque() and then convert it to UnsafeMutablePointer<Void>.
In the callback, we perform the same operations in reverse to obtain a reference to the original class and modify its value.
When extracting the class from the unmanaged object, we could have called either takeRetainedValue or takeUnretainedValue, that following the same pattern described before, respectively decrement or leave unmodified the reference count of the value.
In this case, we are not decrementing the reference count so that the class will not become releasable once we are out of the closure scope, this class will have to be released manually somewhere else through the unmanaged instance we declared initially.
And this is just one simple, and maybe not the best, example of a category of problems that Unmanaged could solve, to learn more about Unmanaged check out this NSHipster’s article.
Working with Files
Since on some platform we could have to deal directly with files frequently using the standard C library functions, let’s see some examples of how to read and write from files:
let fd = fopen("aFile.txt", "w")
fwrite("Hello Swift!", 12, 1, fd)

let res = fclose(file)
if res != 0 {
    print(strerror(errno))
}

let fd = fopen("aFile.txt", "r")
var array = [Int8](repeating:0, count: 13)
fread(&array, 12, 1, fd)
fclose(fd)

let str = String(validatingUTF8: array)!
print(str) // Hello Swift!
As you can see there is nothing weird or convoluted about file access, this is essentially the same code we would have written in C. Notice that we have full access to errno and all the related functions.
Bitwise Operations
Since it’s highly likely that you’ll need to perform bit mask operations when interoperating with C, i recommend a post I wrote a while ago on the subject that should cover all you need to know.
Get the mixed Swift/C playground for this post from GitHub or zipped.
Swift and C: Mixed Projects
Swift projects can access libraries written in C using a bridging header following the same procedure used for Objective-C libraries.
But since this does not work for framework projects, let’s see a more general alternative approach that has only slightly more of typing involved. We’ll create a LLVM module that will contain the C code we want to export to Swift.
Let’s suppose we’ve added to our Swift project a C source file:
//  CExample.c
#include "CExample.h"
#include <stdio.h>

void printStuff(){
    printf("Printing something!\n");
}

void giveMeUnsafeMutablePointer(int* param){ }
void giveMeUnsafePointer(const int * param){ }
And its header:
//  CExample.h
#ifndef CExample_h
#define CExample_h

#include <stdio.h>
#define IAMADEFINE 42

void printStuff();
void giveMeUnsafeMutablePointer(int* param);
void giveMeUnsafePointer(const int * param);

typedef struct {
    char name[5];
    int value;
} MyStruct;

char name[] = "IAmAString";
char* anotherName = "IAmAStringToo";

#endif /* CExample_h */
To keep the C sources separated from the rest we’ve put these files in the CExample sub-directory in the root of the project.
We must now create a module.map file in that same directory and this file will declare what our C module exports and from which header file.
module CExample [system] {
    header "CExample.h"
    export *
}
As you can guess, we are exporting all the content declared in the header but modules can also selectively export only part of what’s declared.
Furthermore, in this example the actual source of the library is contained in the project, but if you need to expose to Swift one of the libraries you have installed on your system you can just create a module.map (not necessarily in its own directory) and specify as header one or more of your system’s headers. In this case you’ll likely need to specify the name of the library your headers refer to too using the link libname directive in your modulemap (that will link that library as you would manually do with -llibname). And you can also declare more than one module in a single module.map.
To learn more about LLVM modules and all the options available check out the official documentation.
The last step consist in adding the module directory to the search path of the compiler. To do this, open the project properties and add the module path (${SRCROOT}/CExample) to Import Paths under Swift Compiler - Search Paths:
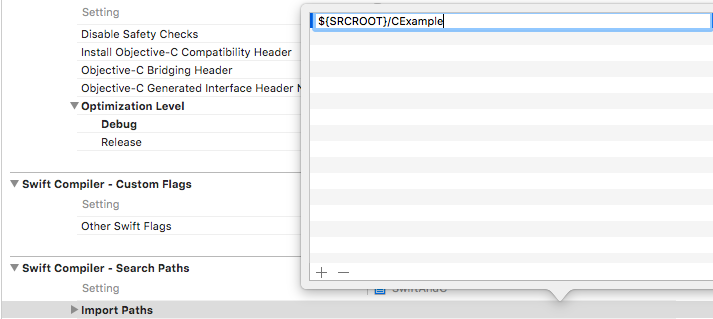
And that’s it, we can now import from Swift the new module and use what it contains:
import CExample

printStuff()
print(IAMADEFINE) //42

// Pass a bogus pointer at address 0x1
giveMeUnsafePointer(UnsafePointer<Int32>(bitPattern: 1))
giveMeUnsafeMutablePointer(UnsafeMutablePointer<Int32>(bitPattern: 1))

let ms = MyStruct(name: (0, 0, 0, 0, 0), value: 1)
print(ms)

print(name) // (97, 115, 100, 100, 97, 115, 100, 0)
//print(String(validatingUTF8:name)!) // Cannot convert it

print(anotherName) //0xXXXXXX pointer address
print(String(validatingUTF8:anotherName)!) //IAmAStringToo
Swift Package Manager
The Swift Package Manager supports the creation of C modules via module.map as described in the documentation. You can either create mixed projects or create a main project importing various sub-projects, each one providing a wrapper module (with likely some Swift to decorate the original C API) for each different C library you need to use.
Swift 3 Changes
The third major release of Swift introduces many changes related to pointers and other functionalities shown in this article, some of the pertaining Swift Evolution proposals are: SE-0016, SE-0055, SE-0076, SE-0101, SE-0107, SE-0136 and finally SE-0138 that extends SE-0107 and has been implemented in Swift 3.0.1.
With SE-0107, a new UnsafeRawPointer type has been introduced to replace the UnsafePointer<Void> that was used in Swift 2.2 code for pointer without type information and strict aliasing for the pointers element type is now enforced. A comprehensive migration guide is available to help the transition.
Closing Thoughts
I hope this article will at least shed some light on the mysterious and scantily documented world of Swift and C interoperability but I don’t really expect to have covered everything you could encounter in your projects.
You’ll find yourself in situations where a bit of experimenting will be needed to make things work as you want and it’s likely that C interoperability will be improved over the next releases of Swift (UnsafePointer and all the related functions were introduced just in Swift 2.0, before that, interoperability with C was a bit more convoluted) with new constructs.
Did you like this article? Let me know on Twitter!